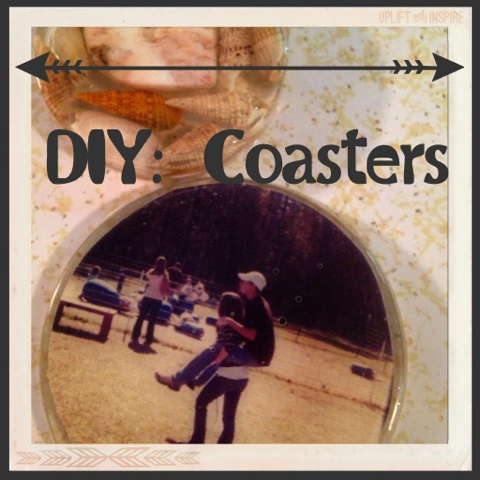
DIY Photo Coasters
Materials needed:
•EasyCast Clear Casting Epoxy "Low Odor" (A 16oz box from Hobby Lobby can make a good quite a few coasters, and it comes with resin and Gardner mix together)
•Reusable mold (Hobby Lobby sells some small ones, but if you want a coaster size, Amazon and Resin Obsession sell cheap ones)
•Mold Release & Conditioner
•Modge Podge
•Paint Brush
•Newspaper or some thing to cover your work area
•Disposable Nitrile Gloves (Cheap and can be found at Hobby Lobby)
•Some craft sticks to stir or disposable spoons
•One ounce disposable medicine cups( can be found at Hobby Lobby as well)
•Disposable cups to mix in (solo cups work well, just make sure you use all of the mix as soon as you make it. The longer it sits in the cups, I hear it starts to break down the cup. Just make sure to do your research on what cups or mixing items work with resin or epoxy. I use the disposable plastic and have never had a problem.
(Now this list can be expensive if you buy everything at once. After you have everything though, you have a supply that will last you a good while depending on how many coasters you make. Hobby Lobby is one of my favorite stores. One of my favorite things about Hobby Lobby, is if you download the app you can get a 40% coupon each week valid to one item. That is how I purchased most of my supplies. Just a few random trips with a
great coupon. I also watch what goes on 50% off each week.)

Okay so here we go......
1. Take your photo and cut it to fit
the mold. Then, lay it over a small area of newspaper. Take the pair brush and paint a thin layer over the photo. I waited ten minutes and repeated this step. You should do this 3-5 times. It helps the photo from the epoxy leaking in.

2. Take two cups and fill them 3/4 way with warm water. Put your resin in one cup and the hardener in the other cup. Let sit for about ten minutes. MAKE SURE WATER IS NOT HOT!!!
3.Cover your work area with some newspaper. I was out this time, so I put two layers of paper towels. Spray your mold release conditioner and let dry. ( I do my coasters on a day I clean my house. I find I have more patience waiting for each step and coming back to it.
Everyone has their own way of doing things.

you choose to make one that is not a picture.
Lets begin playing mad scientist!
Your EasyCast kit should come with instructions. Your more than welcome to use those instructions as well.
5. Put your gloves on! Measure equal amounts of resin and hardener mix in the one ounce cups. One
Ounce of each should be enough. Make sure to put resin in one and hardener in the other not mixed together. Make sure the portion is the same in each cup. Not measuring equal parts should result in a sticky coaster.
6. Pour the portioned resin and hardener in to one mixing cup. Take a wooden craft stick or disposable spoon and mix for two minutes. There will be little bubbles in the mix. Don't worry about them.
7.Pour a small layer of the mix into the mold. Take the photo and gently place the photo into the mold. Use the craft stick to gently push it into the mix. Then after you see the photo is been pressed into the mixture, you can then pour the rest of the mixture on. The same would apply if you were making one with bottle tops or any other trinkets. You would pour a small layer of the mix in to the mold. You would the place your items how you want them. If you need to move them use your wooden craft stick. After all items are places, pour the remaining mix over the items.
Okay.. Bubbles....Bubbles... Bubbles.. Through this process you will see your casting has several tiny bubbles. If you google how to get rid of them you should find several ways, but very tedious. I find they don't really show, or are not very noticeable so I leave them be.
8. MOST IMPORTANT STEP
You have to wait 24 hours!!! If you do it at 3:00 pm, you need to wait until 3:00 pm the next day.
My first bottle top coaster, I was so impatient.! After 12 hours it was hard and looked ready. I couldn't wait to see what I had made. Why wait another 12 hours?? It was clearly ready because
It was hard. So I pushed it out.
It eventually developed a cloudy color
On the backside and had smudged fingerprints all over it. I was disappointed.
So the next one I did , I waited the whole 24 hours and turned out beautiful!
I hope these instructions were helpful. I hope you make a beautiful coaster.!
Please feel free to send me a pic of your creation!

